Introduction
The Moto G Power is a versatile and all-round Android smartphone from Motorola. It comes with an elegant design and good features that make it stand out from the competition. The current article is developed as a complete guide on the Moto G Power smartphone. The detailed process of rooting your Moto G Power, along with the other related aspects are discussed. How to Root Moto G Power? The article also provides details of how to do a soft reset and a hard reset on the phone. The process of taking a screenshot on the Moto G Power is also provided in the article.
How to Root Moto G Power
Rooting is the process of getting administrative control over Android subsystems in a smartphone. You can gain complete administrator and privilege rights on a rooted smartphone. The process of rooting your Moto G Power smartphone and other related aspects are discussed below:
Part 1: Extract and Patch Boot. Img Using Magisk
The first part of rooting your Moto G Power is to extract and patch the boot.img file on it using Magisk Manager. The steps for doing the same are as follows:
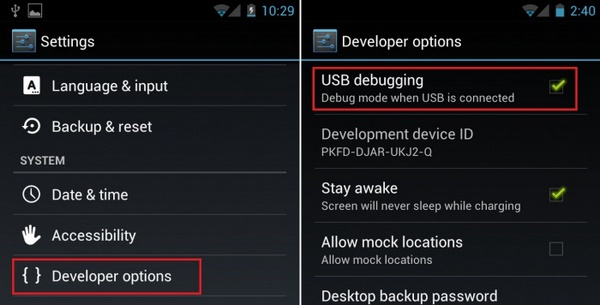
- Go to the “Settings” option on your smartphone.
- Scroll to “About Phone” and tap on it.
- Locate “Build Number” and tap 7 times on it. You will see a message “You are now a developer”. This means the developer options on your Moto G Power is now enabled.
- Go back to the “Developer Options” and search for “USB Debugging”. Enable the toggle key for the “USB Debugging” option.
 Download the ROM and extract it to your computer.
 - Now connect your smartphone to the computer using a USB cable.
- Search for the “boot.img” extracted file on your computer and move it to the internal storage of your smartphone.
- Open the Magisk Manager app. A pop up will appear. Choose the “Install” tap.
- Tap on the “Patch Boot Image File”.
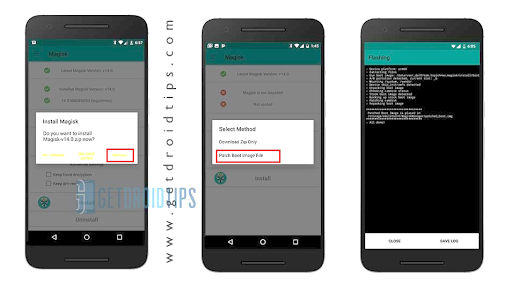
- Browse to the “boot.img” file copied earlier to your phone’s internal storage.
- Wait for a few seconds. Magisk Manager will start patching the boot image.
- Once the process for patching the boot image is completed, copy the “patched_boot.img” from internal storage and put it in the same folder as the earlier extracted ROM file.
Part 2: Install the Patched Boot Image
The next part of rooting is to install the patched boot image file. You need to follow the below-mentioned steps for doing the same:
- Extract the ADB and fastboot tool and move the patched image file to the same folder.
- Open the command prompt on your computer and type the following command- fastboot flash boot patched_boot.img.
- Wait till the flashing process gets completed.
- Once the flashing is completed, type the following command on the prompt- fastboot reboot.
- Your smartphone will reboot after the rooting is completed. You will get a rooted Moto G Power after the reboot.
Checking the Root Status
Once the rooting process is complete, you should check for the root status. The following steps should be followed for checking the root status:
- Open the Magisk Manager app on your smartphone.
- You will be able to see the root status on the screen. If all options are green ticked, it denotes the successful rooting of your smartphone.
Benefits of Rooting
Rooting an Android phone has obvious benefits. You get administrator privileges over your phone’s hardware functioning and operating systems that were otherwise not available. Rooting allows you to delete pre-installed apps that are not possible to do on a regular unrooted device. This can help save space on the internal storage thereby making your phone run smoother and faster. You can also underclock the processor to improve battery life or overclock it to get more processing power. There are many customized skins and other visual aesthetic elements that you can install on a rooted smartphone. You can install custom ROM on your rooted Moto G Power smartphone. Hence, rooting your phone provides you newer options and features that can give you a much better end-user experience.
Also, Read: How To Root ZTE Blade 10 Prime
Drawbacks of Rooting
With the obvious benefits of rooting, there are some drawbacks that you should also know. Your smartphone comes with a manufacturer’s warranty that covers damage and repair costs if any warranted part is damaged. If you root your phone, your warranty will become void. This is the biggest drawback of rooting an Android phone. You can also end up installing custom ROM and other apps from untrusted sources. This can damage your phone due to malware. Rooting an Android smartphone is a technical and complex process that may cause damage to the phone. In some cases, the damage may be irreparable. You should also check your contract if you have purchased the phone under a lease. Rooting such a phone can possibly lead to a breach of the contract.
You should weight the pros and cons of rooting your Moto G Power phone. You should see whether you want to root it or not. Only when you feel the need to root it, you should do so.
Prerequisites of Rooting
Before you start rooting your phone, ensure it is sufficiently charged. Rooting an Android phone takes a long time and if the phone gets switched off in between, it can get severely damaged. The operating system and the firmware can become corrupted in such cases. You must take data backup as the data may be erased during rooting your Moto G Power smartphone. You must be very careful to download the image file that is compatible with Moto G Power only and not any other model or manufacturer. To root your smartphone, you will also need a computer, internet, and USB data cable.
Also, Read: How to Get Fortnite on LG Stylo 5
How to Take Screenshot on Moto G Power
Taking a screenshot is an effective way of capturing important information. You can save this information in the form of images that can be used for future reference or shared with your contacts instantly. Any important legal information, current affairs, etc. can be captured instantly from web pages or offline documents on your phone. The process of taking a screenshot generally varies among smartphones. The process of taking a screenshot on your Moto G Power smartphone is as follows:
- Prepare the content on the screen for which you want to take a screenshot.
- Hold and press the power button and the volume down button on the phone for nearly 3 seconds.
- There will be a flash on the screen, denoting that your screenshot has been successfully captured.
- You can now edit or share the saved screenshot instantly.
Where are the Screenshots Saved?
The screenshots are saved in the gallery. You can access them by opening the gallery. You can choose to edit these screenshots to suit your preferences or decide to share it in its original form. These screenshots can be seamlessly shared with multiple recipients on messaging apps and social media platforms.
Also, Read: How to Send Gif on LG G9 ThinQ
How to Do a Factory Reset on Moto G Power
A factory reset (also known as a hard reset) is used for restoring your smartphone to the original settings it shipped with. This means a factory reset will remove all newly added data, apps, and customizations that you had done after buying the phone. You must take a data backup before doing a factory reset. The process for doing a factory reset on your Moto G Power smartphone is discussed below:
First Method: Doing Factory Reset Using Recovery Mode
The first method to do a factory reset on your Moto G Power smartphone is by using the recovery mode. This is a more technical and complex method of performing a factory reset. You should know the steps and technicalities before doing it. The following steps are involved in doing the factory reset by this method:
- Press the power key and turn off your phone.
- Wait for a few seconds and press the power key and volume down key at the same time.
- Once the fastboot mode appears on the screen with the Android robot, let go of all the keys immediately.
- Use the volume keys to scroll the fastboot mode. Scroll to the “Recovery Mode” and confirm by pressing the power key.
- You will now see the recovery mode screen on the display.
- Scroll down to the “wipe data/factory reset” option using the volume keys and press the power key to confirm the selection.
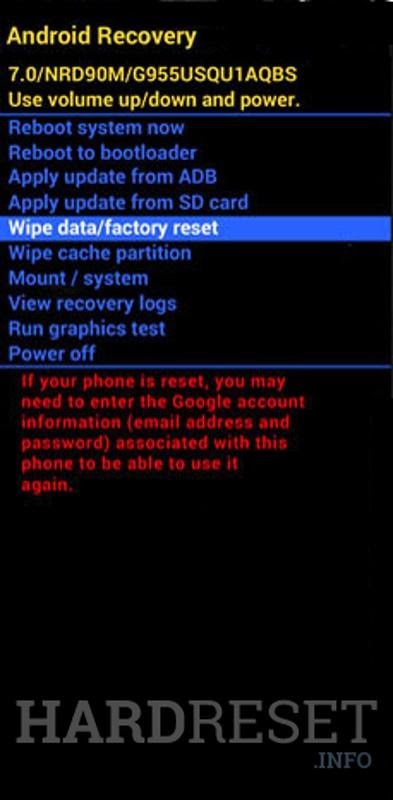
- Scroll down to the “Yes” option on the next screen. Confirm the selection by pressing the power key.

- This will wipe the complete data. You will be navigated to the main page of the recovery mode screen. Scroll down to “Reboot System Now” and confirm by pressing the power key.
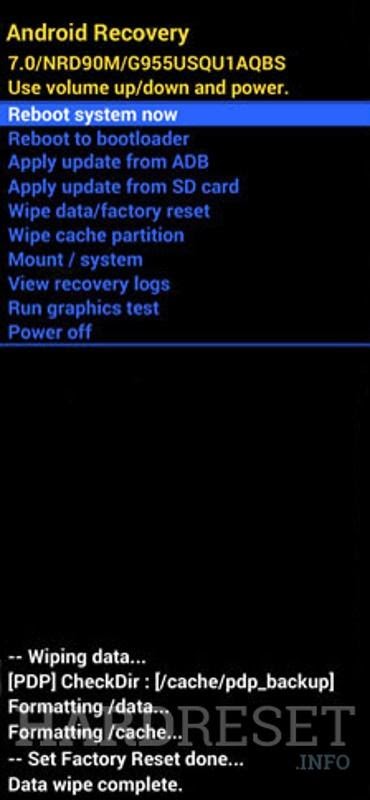
- Your phone will reboot. Once it restarts, the factory reset will be successfully completed.
Also, Read: How to Root OnePlus 8 Pro
Second Method: Doing Factory Reset Using Notification Panel
The second and a simpler way of doing a factory reset on the Moto G Power is to use the notification panel. You can follow the below-mentioned steps to do so:
- Go to the “Settings and Systems”.
- Tap on “Reset”.
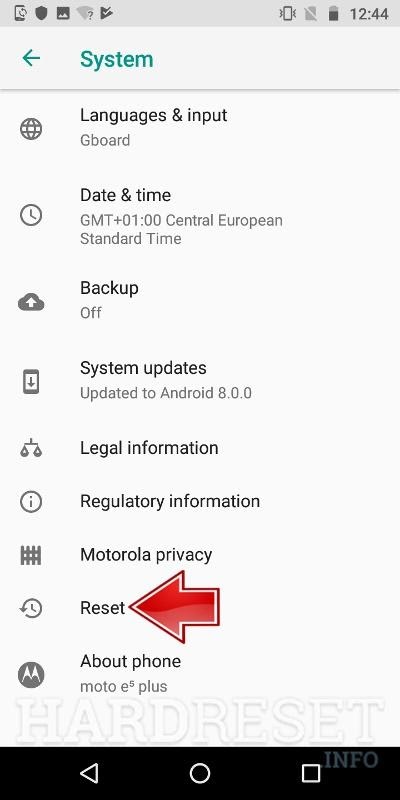
- Click on the “Factory Data Reset” on the next screen.
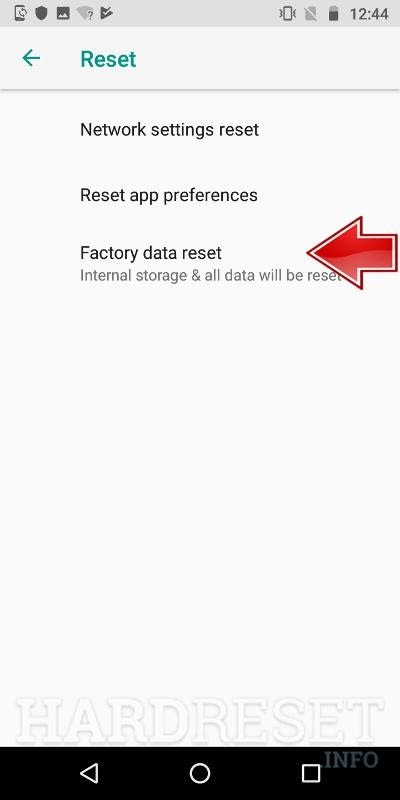
- Now select “Reset Phone”.
- Tap on the “Erase Everything” button on the next screen.

- Your phone will be reset after you confirm the choice.
When You Can Consider Doing a Factory Reset
There will be situations when you should consider doing a factory reset on your Moto G Power. Sometimes after a software upgrade or due to some malicious apps, your smartphone may malfunction. Issues like freezing of the screen, phone getting hanged, apps freezing, etc. can emerge regularly. If these issues are not getting resolved by a soft reset or troubleshooting, then you should consider doing a factory reset. Another situation where doing a factory reset is strongly recommended is before selling your phone. This will wipe out all your data and sensitive information on the phone and you can be assured it will not be breached or misused later.
Also, Read: How To Root Google Pixel 3A and 4XL
Things to Remember Before Doing a Factory Reset
The first thing to remember before doing a factory reset is that is should not be done regularly. If there are minor technical or performance issues on your smartphone, you can try to resolve it through a soft reset or other basic troubleshooting. Most minor issues can be resolved by this. Only if the issue persists, should you consider doing a factory reset? Doing a factory reset will wipe out all data and applications on your phone. You must take a data backup before the factory reset. This will help you to restore your smartphone quickly to its earlier status after the factory reset is completed.
You should ensure that your phone is sufficiently charged before doing the factory reset. The process may take some time to get completed. If your phone switches off in between, it may get damaged. Ideally, you should ensure that the phone is charged at least up to 70% before doing a factory reset.
Also, Read: How To Use ROMS On Dolphin Emulator
How to Reboot/Restart Moto G Power
Rebooting/restarting (also known as a soft reset) your Moto G Power smartphone can help solve some minor technical issues. There are times when your phone hangs, runs too slow or apps crash. You can try to do a soft reset to solve these problems. Doing a soft reset is very simple and does not require any technical knowledge. As already discussed, you should first try to do a soft reset and basic troubleshooting for addressing any issues. If the issue cannot be solved, then only you should try to do a factory reset. There is no need to take data backup before doing a soft reset as no data is wiped out during this process. The steps for doing a soft reset on your Moto G Power smartphone are as follows:
- Press the power key for a few seconds to turn off the phone.
- Once the phone is turned off, wait for a few seconds before powering it back.
- Press the power key again for a few seconds till you see the logo on the screen.
- You have successfully completed the soft reset on your Moto G Power smartphone.

