Introduction
Google Pixel 3A and 4XL are excellent smartphones. You get top-end features and the latest Android updates with it. The current article discusses the process of rooting the Google Pixel 3A and 4XL smartphones. The different methods of taking screenshots on it are also detailed. The process of doing a hard and soft reset is discussed too. Here, you can find the details about how to root google pixel 3A and 4XL.
How to Root Google Pixel 3A and 4XL
Rooting an Android smartphone gives you developer and administrator rights that were previously not available. How To Root Google Pixel 3A and 4XL? The process of rooting your Google Pixel 3A and 4XL is discussed below:
Part 1- Unlocking the Bootloader
The first part towards rooting your Google Pixel 3A and 4XL is to unlock the bootloader. Doing so will wipe all data on your phone. Hence, you must take data backup before unlocking the bootloader. You can unlock the bootloader by the following steps:
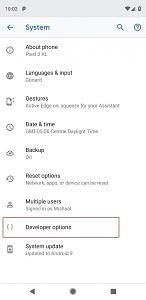
- Open “Settings” on your phone.
- Go to the “Systems” tab.
- Click on “About Phone” and scroll to find the “Build Number”.
- Click 7 times on “Build Number”.
- You will get a message that “You are now a developer”.
- Go back one page to “Developer Options”.
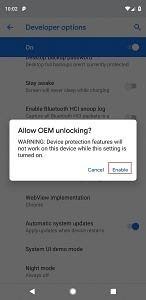
- Enable the “OEM Unlocking” and “USB Debugging” from the “Developer Options” tab.

- Now connect your smartphone to the computer.
- Open the command prompt on your computer. Type the following command- adb devices
- Reboot to the bootloader menu by typing this command – adb reboot bootloader.
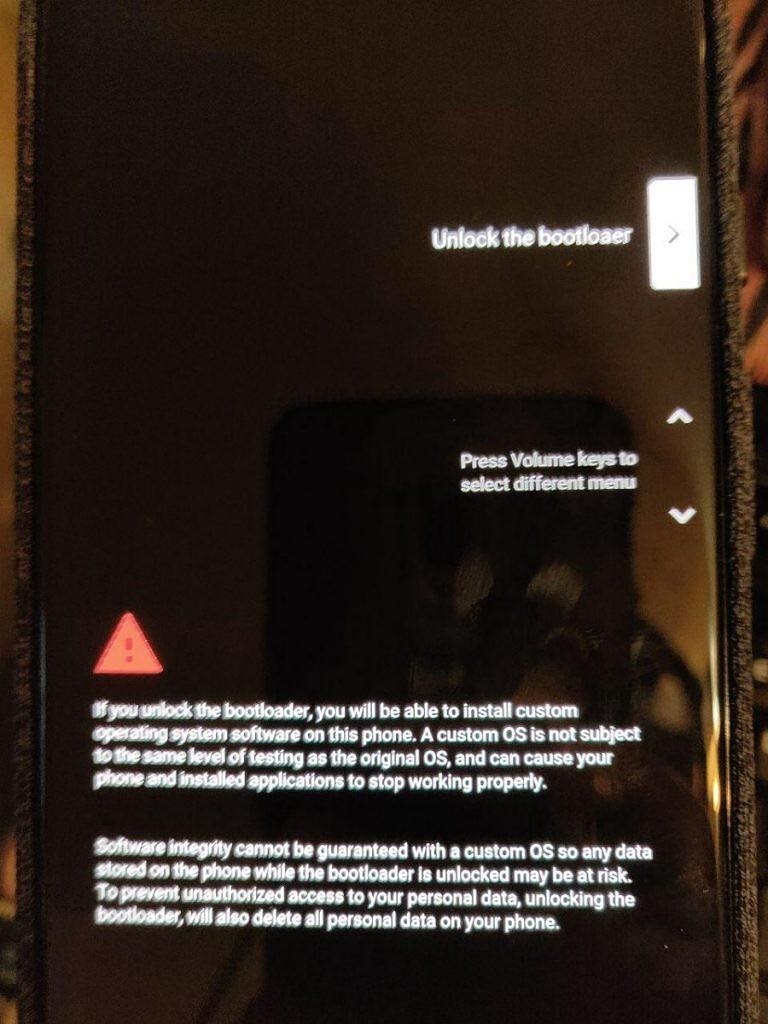
- The next step is to unlock the phone’s bootloader by typing this command- fastboot flashing unlock.
- A screen will appear warning you about the dangers of unlocking the bootloader. Scroll using the volume keys till “unlock the bootloader” option appears. Press the power button after it to confirm your choice.

- Reboot your phone by typing the following command- fastboot reboot


Part 2- Rooting the Phone with Magisk
Once the bootloader has been unlocked, the next step is to root the Google Pixel 3A and 4XL, using Magisk. The process for the same is detailed below:
- Download the factory image package for your smartphone.
- Extract the downloaded folder and search for the file named “boot.img”.
- Put the “boot.img” file on your phone’s internal storage.
- Download and install the latest version of Magisk Manager.
- In the Magisk Manager, tap “Install”.
- Choose and wipe he “Select and Patch a File” option.
- Browse for the “boot.img” file and click on “Done”.
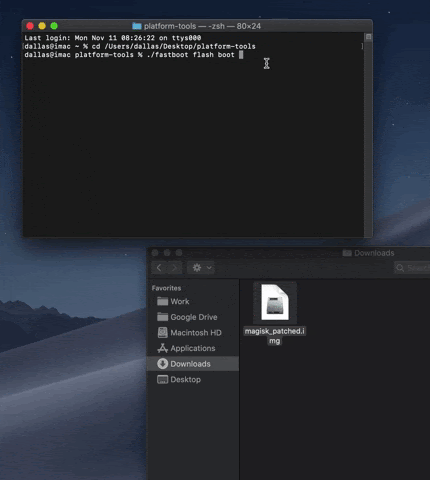
- Copy and move the patched file to your computer.
- Switch off your phone and wait for a few seconds.
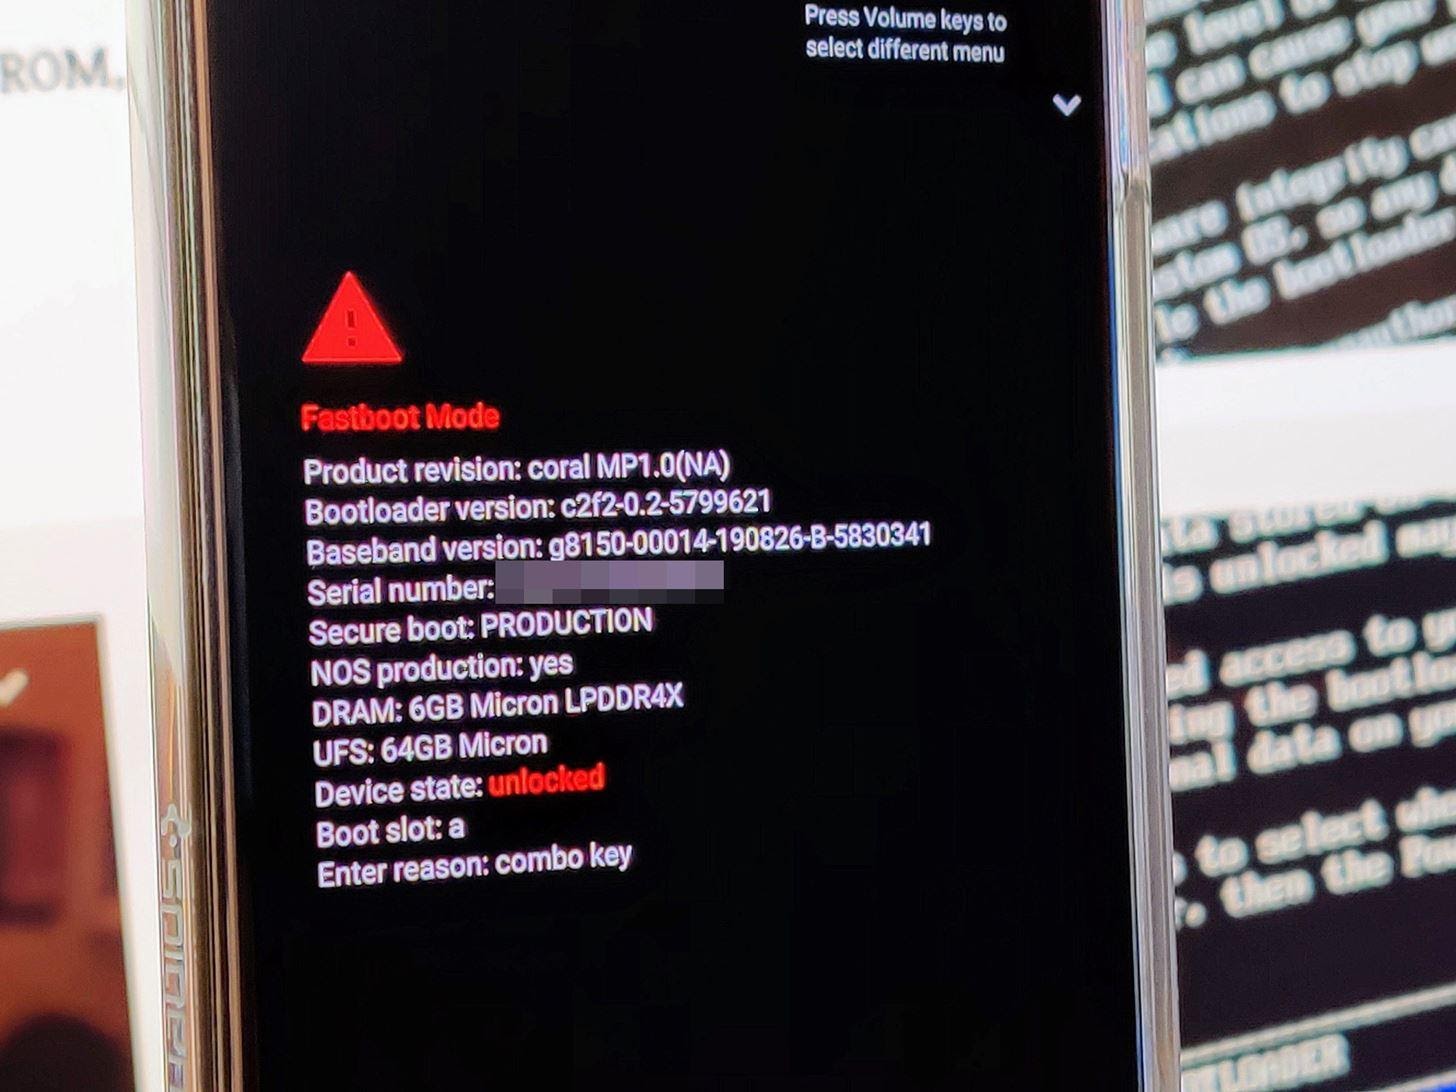
- Press the power button and volume down button at the same time until the Fastboot Mode opens.

- Connect the phone to your computer in the Fastboot mode.
- Go to the command prompt of your computer and type – fastboot flash boot
- Locate the “magisk_patched.img” file and drag it to the command prompt and then hit enter. This will install the file on your phone.

- Type the command- fastboot reboot- on the command prompt. This will reboot your phone from Fastboot Mode.
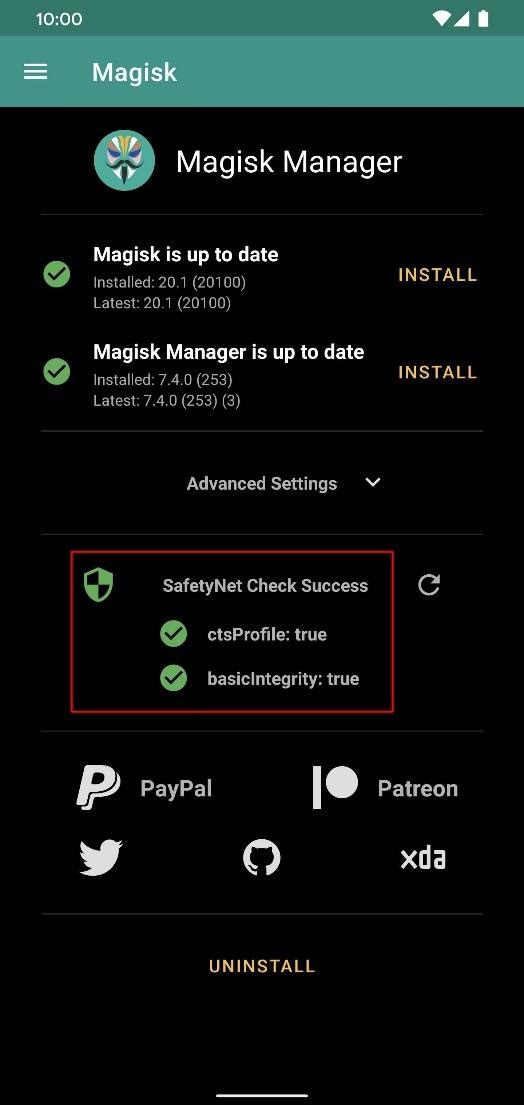
- Go to the Magisk Manager app for checking the root status of your phone.

Pros of Rooting
Once you root your Google Pixel 3A and 4XL smartphone, you get access to developer options that were not available earlier. You can get complete administrator control of the phone. A rooted smartphone allows you the flexibility to control the working of RAM, battery, operating system, etc. You can overclock your phone to get more power from the processor or underclock it to improve battery life. It becomes possible to change the customized skins and visual aesthetics of your Google Pixel 3A and 4XL after rooting it. The pre-installed apps can be removed in a rooted Android smartphone that is not possible without rooting. This allows you to clear more space on the internal storage and improve the phone’s performance.
Cons of Rooting
There are a few risks associated with rooting your Google Pixel 3A and 4XL smartphone. One of the biggest deterrents to rooting a smartphone is that you lose the warranty on doing so. Once you root the phone, you will be unable to claim the manufacturer’s warranty on it as it becomes void. Rooting an Android smartphone is a technical process. It can sometimes result in the phone getting damaged. You should be very careful while rooting your smartphone. Another drawback of rooting a phone is that it may result in a breach of your contract with the manufacturer or the carrier. Hence, you may consider the pros and cons of rooting your Google Pixel 3A and 4XL before doing so.
Considerations Before Rooting
Rooting a smartphone is a lengthy process and takes time. You should ensure that your phone is sufficiently charged before rooting it. If the phone gets switched off during the rooting process, it can cause irreparable damage to it. The data on your phone will be erased while rooting it. Hence, you must take a data backup to restore your phone to its original condition after it is rooted.
Also, Read: How to Root OnePlus 8 Pro
How to Take Screenshot on Google Pixel 3A and 4XL
You may want to capture some important information on your phone’s screen for instant sharing or future reference. This can be done by taking screenshots. Taking a screenshot helps you to capture and save important information that you may need later. Each smartphone has a different mechanism of taking screenshots. The process of taking screenshots on your Google Pixel 3A and 4XL is as follows:
Method 1: Taking Screenshot Using Phone Keys
The simplest way to take a screenshot on your Google Pixel 3A and 4XL are by using the phone keys. It is a quick way of capturing the screenshot. The following steps are involved in the process of capturing screenshot using your phone keys:
- Open the content on your phone for which you want to take a screenshot.
- Press the power button and the volume down button at the same time.

- Now release both the buttons simultaneously.
- You will observe a flash on your phone’s display that indicates the successful capture of the screenshot.
Method 2: Taking Screenshot Using Phone Keys (Different Combination of Keys)
There is another way to take a screenshot on your Google Pixel 3A and 4XL phone using the phone keys. You need to adhere to the below-mentioned steps for doing so:
- Prepare the content on your phone’s screen for taking the screenshot.
- Long press the power button on your phone for a few seconds.
- You will see a few icons/options appear on the screen- “Power On”, “Restart”, and “Screenshot”. You need to tap on the “Screenshot” option.
- A notification will pop up on the top of your smartphone’s screen. This means that the screenshot has been successfully captured.
Method 3: Taking Screenshot Using Google Assistant
You can use the Google Assistant for taking a screenshot on your Google Pixel 3A and 4XL smartphone. This is an innovative and contactless way to capture screenshots. It can be done through the following steps:
- You must ensure that the Google Assistant is enabled on your smartphone.
- Prepare the screen and the content for which you want to take a screenshot.
- Activate the Google Assistant. This can be done by either saying “Hello Google” or long-pressing the home button.
- When the Google Assistant opens, say “Take a Screenshot”.
- You will see a notification popping on the top of your phone’s screen. Your screenshot has now been successfully captured.
Also, Read: How To Root Samsung Galaxy S20 Plus Ultra
How to Access the Saved Screenshots
On the Google Pixel 3A and 4XL, the saved screenshots are saved in a special folder that can be accessed through the Photos app. You can access the saved screenshots through the following steps:
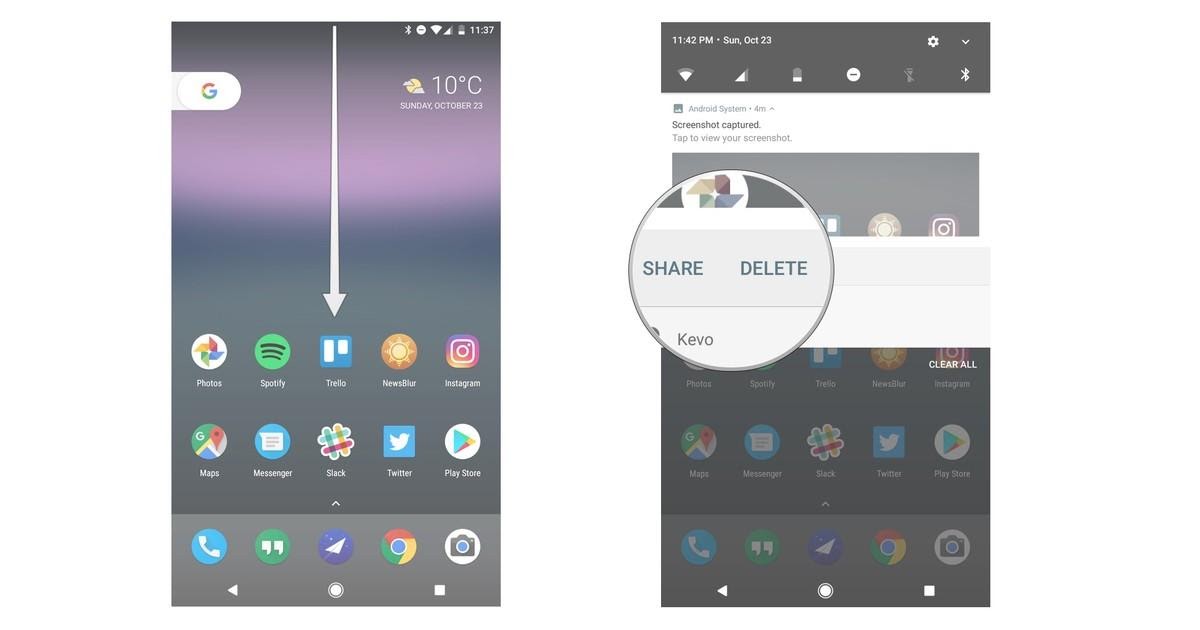
- Swipe down the notification panel.
- Tap on the “screenshot” icon to open it.

- Click on “Share” or “Delete” options to take the required actions with screenshots.
You can also access saved screenshots using Google Photos through the following steps:
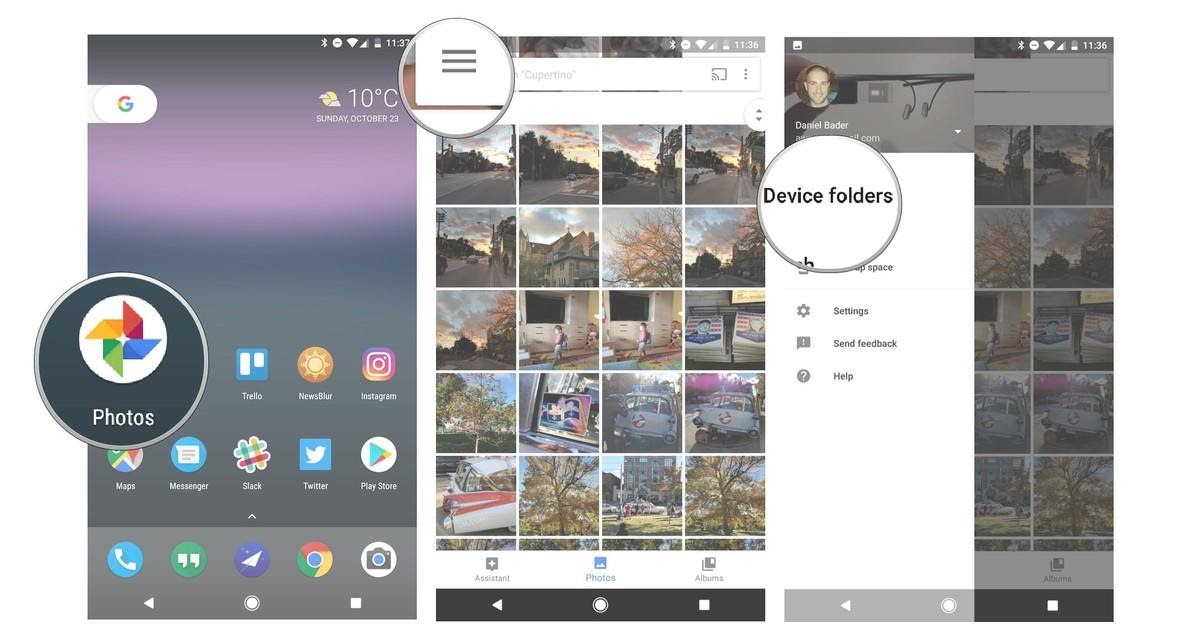
- Open Google Photos on your phone.
- Click on the three-line menu tab on the top left side of the screen.
- Tap on “Device Folders”.
- Click and open the “Screenshots” folder.
- Once the screenshots folder is open, you can open or share the screenshots based on your requirement.
Also, Read: LG Smartphone Price List
How to Factory Reset Google Pixel 3A and 4 XL
A factory reset clears all data on your phone and restores it to the original configuration and settings it was shipped with. The different methods of doing a factory reset on Google Pixel 3A and 4XL and why you may consider doing it are discussed below:
First Method
The first method of doing a factory reset on your Google Pixel 3A and 4XL is by doing so in recovery mode. The following steps are involved in the same:
- Switch off your phone by pressing the power button for a few seconds.
- Press the power button and the volume down button at the same time.
- Release the buttons once the Fastboot mode appears on the screen.
- Use the volume keys to scroll and select the “Recovery Mode” and press the power button to confirm your choice.
- You will get the image of the Android robot on the screen. Press the power button and after a few seconds press the volume up button once.

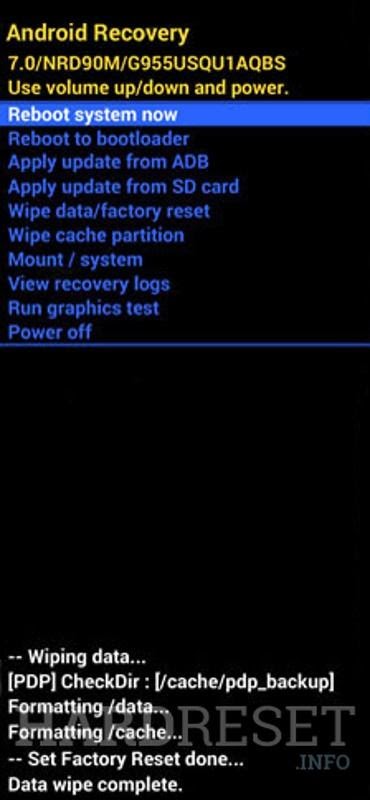
- The Android recovery mode screen will appear. Scroll to the “wipe data/factory reset” option using the volume keys.

- Select “Yes” and confirm by pressing the power button.

- On the next screen select the “reboot system now” and confirm by pressing the power key.

- You have completed the factory reset on your Google Pixel 3A and 4XL smartphone.


Second Method
The second method of doing a factory reset on the Google Pixel 3A and 4XL is by using the settings menu. This is a simpler method and can be done without much technical knowledge. You should follow the below-mentioned steps for doing a factory reset using this method:
- Pull down the notification panel and go to “Settings”.
- Go to the “Restart Options” and choose “Erase All Data”.
- Select “Reset Phone” and “erase everything”.
- The factory reset on your phone will be complete.
Also, Read: How to Setup voicemail on LG G9 ThinQ
Why Do a Factory Reset?
There are times when you may want to restore your smartphone to the original settings it shipped with. You may do a software upgrade that can result in your phone malfunctioning. If troubleshooting does not resolve the problem, then doing a factory reset may be the only option left for addressing it. Most of us install several apps on our phones. Some of these apps may have security or performance issues and can cause the phone to malfunction. If the problem persists even after uninstalling the app, then doing a factory reset may solve the problem. Another situation that may need you to do a factory reset is while selling your phone. You would not want your personal and sensitive data to be accessed by others. You can perform a factory reset to wipe all the data and sell it to the buyer in the original condition it was shipped to you.
Things to Remember Before Doing Factory Reset
You should remember that the factory reset should not be done regularly. For minor performance and technical issues, you should try to do basic troubleshooting first. Only when the issues cannot be resolved through troubleshooting, should you do a factory reset. It is important to take data backup on your phone before doing a factory reset. This will help you to restore the phone to its earlier status after the factory reset is complete.
Also, Read: How to Send Gif on LG G9 ThinQ
How to Reboot/Restart Google Pixel 3A and 4 XL
Rebooting/restarting (also known as a soft reset) your Google Pixel 3A and 4XL helps to address minor technical issues. Your apps may freeze, or the phone may hang, which can be resolved by rebooting it. The steps involved in rebooting/restarting are as follows:
- Press the power key for a few seconds till the phone switches off.
- Wait for a few seconds and then press the power key again to turn on the phone.
- The process for soft reset is completed on your Google Pixel 3A and 4 XL.
You should try to do a soft reset on your phone for minor issues before doing a factory reset. Only if these issues are not resolved by soft reset and other troubleshooting, you should consider doing a factory reset.
Also, Read: How to Install PUBG on LG Stylo 5? Step by Step Guide


 with Data Analytics")


