Introduction
The Samsung Galaxy S20 Plus Ultra is perhaps one of the best Android flagship smartphones in the market. It is an exquisitely designed smartphone that comes loaded with features. You will find it difficult to know and use all the features offered by this top-end smartphone on your own. Hence, we developed this guide to help you know the key features of this smartphone. The current article provides detailed insights and processes involved in performing some of the important functions of the how to root Samsung Galaxy S20 Plus Ultra.
How to Root Samsung Galaxy S20 Plus Ultra
Rooting your latest Samsung Galaxy S20 Plus Ultra provides you a highly customized and powerful Android smartphone. The complete details pertaining to rooting your smartphone are discussed below:
What is Rooting?
Rooting a smartphone allows you developer options that were not available earlier. You can take greater control of your phone and its operating system. Rooting also provides you the flexibility to modify different applications and get the administrator control on your smartphone. Rooting can provide you complete control and freedom to customize your Samsung Galaxy S20 Plus Ultra. You can perform developer functions like removing pre-installed OEM applications, change boot logo fonts, install custom Android 10 ROM, etc. through rooting your Android smartphone.
Important Considerations Before Rooting
You should keep the following considerations in mind before rooting your smartphone:
- Your Samsung Galaxy S20 Plus Ultra should be fully charged. The battery should have a minimum charge of 80% before starting the rooting process as the process takes a long time to complete.
- You should unlock the bootloader before starting the rooting process. this is because an Android manufacturer does not allow you to root in a locked bootloader.
- It is highly recommended to take a backup of all the data on your phone. In case something goes wrong, you will have the data to restore later.
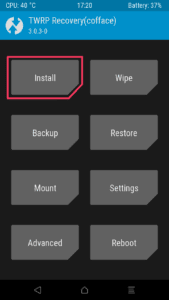
- Install TWRP Recovery on your phone.
Benefits of Rooting Samsung Galaxy S20 Plus Ultra
The following are the key benefits of rooting your smartphone:
- You get administrator control over your phone and its operating system. You can control the way applications work and modify them to suit your needs.
- Rooting allows you to decide which apps to keep or delete. Some OEM apps can only be removed on a rooted smartphone.
- You can also customize the working of your smartphone. It is convenient to get more power by overclocking the processor or improve battery performance by underclocking it.
- You can install Android 10 and Android 11 beta ROM and upgrade to the latest Android version.
- Changing skins and finetuning other aesthetics of your smartphone is another great reason to root it.
Drawbacks
There are a few drawbacks too of rooting your Samsung Galaxy S20 Plus Ultra, which are as follows:
- One of the biggest drawbacks of rooting your Samsung Galaxy S20 Plus Ultra is that your warranty becomes void. However, you can try to delete Magisk files using root browser to get back your warranty.
- Your smartphone will not get the latest OTA updates after you root it.
- There can be times when due to some technical issues, your smartphone or some of its components may malfunction while rooting it.
Rooting Samsung Galaxy S20 Plus Using Magisk Manager
- Download the latest version of Magisk Manager and copy it to the phone’s internal storage.
- Once copied, install it on your phone.
- Turn off your phone and wait for a few seconds.
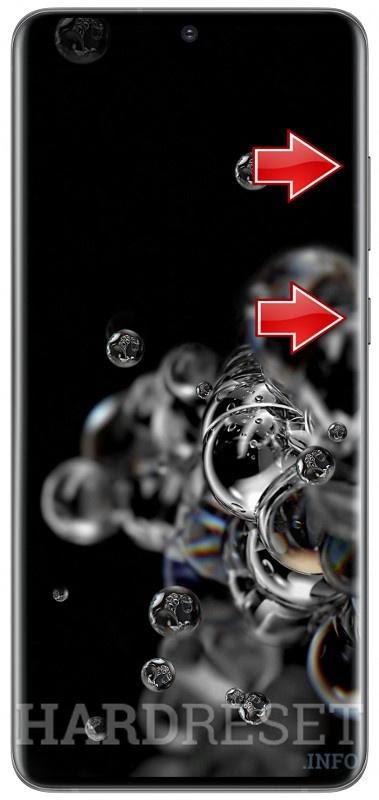
- Restart by pressing the power and volume up button at the same time. Leave the power button once the logo appears on the display.
- Your phone will now open in the TWRP recovery mode.
- Open the Magisk Manager app and tap on the install button

- Click on “select and patch a file”.
- Browse for the Magisk Manager file and choose it.
- Magisk Manager will patch the output file in the download folder- “magisk_patched.tar”. Copy these files into your computer.
- Open the Magisk Manager app and tap on “swipe to confirm flash”.
- Reboot the phone after the process is completed. Your Samsung Galaxy S20 Plus Ultra has been successfully rooted.

How to Take Screenshots on Samsung Galaxy S20 Plus Ultra
Capturing screenshots is an important functionality of smartphones. You may want to capture important information or record for future use. This can be done by taking screenshots. Taking a screenshot enables you to instantly share important information with others. You can also use it for record-keeping or as evidence that can be used later. The process of taking screenshots on the Samsung Galaxy S20 Plus Ultra is very convenient and intuitive. You can capture screenshots through various methods based on your convenience and preferences. The different processes for taking screenshots on Samsung Galaxy S20 Plus Ultra are as follows:
Taking Screenshots Using Keys
The simplest and most used way to take a screenshot on your Samsung Galaxy S20 Plus Ultra is to use the phone’s keys. The following steps should be followed for taking a screenshot:
- Prepare your smartphone’s screen for the content you want to take a screenshot of.
- Press the power button and the volume down button at the same time for a second and
 immediately release them.
 - You will see the phone’s screen flash. This means your screenshot has been successfully captured.
- You can access the screenshot from the bottom bar or the notification panel.
- You can edit the screenshot using the editing mode, before sharing it with others.
 immediately release them.
It is important to note that you need to press the buttons only for a second. Pressing it for longer can launch either launch a long-press function or lower the phone’s volume.
Taking Screenshots Using Palm Swipe
You can also take screenshots on this phone using a palm swipe. This is a unique and intuitive way of capturing screenshots on your Samsung Galaxy S20 Plus Ultra. The process for capturing screenshots using this method is as follows:
- Prepare the content you want to take a screenshot of.
- Put your hand vertically on either the left or right end of the phone and swipe it across horizontally across the screen in a single continuous motion.
- You will observe the screen flash that denotes your screenshot has been captured.
- You can access and edit the screenshot using the same process as discussed earlier while capturing screenshot with phone buttons.
Taking Screenshot Using Bixby Voice
If you are unable to grab your phone immediately but still want to capture a screenshot, you can do so by using Bixby Voice. The following process will help you capture a screenshot using this method:
- Open the content on your phone for taking the screenshot.
- You need to launch Bixby Voice. You can do so by either long-pressing the phone’s side button or by saying “Hey Bixby”.
- Once the Bixby Voice opens, say “take a screenshot”.
- Bixby Voice will capture the screenshot. It will be saved in your phone’s gallery from where you can access and edit it later.

How to Factory Reset Samsung Galaxy S20 Plus Ultra
The process for doing a factory reset on your Samsung Galaxy S20 Plus Ultra is detailed below:
- Power off your Samsung Galaxy S20 Plus Ultra. Wait for a few seconds after the phone is powered off.
- Press the power button and the volume up button at the same time.

- Once the logo appears on the display, let go of all the keys.
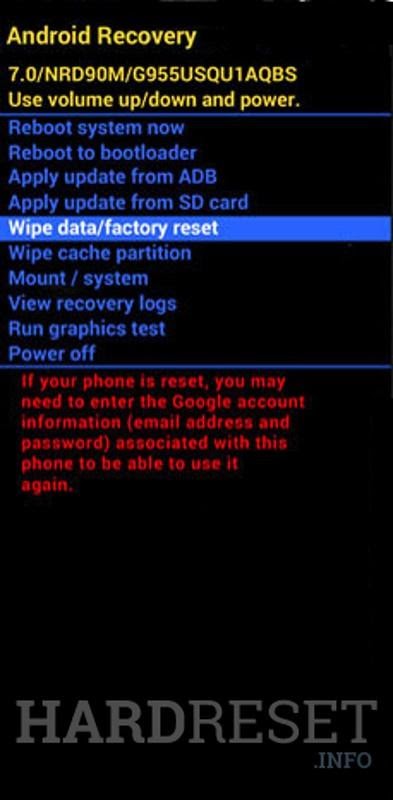
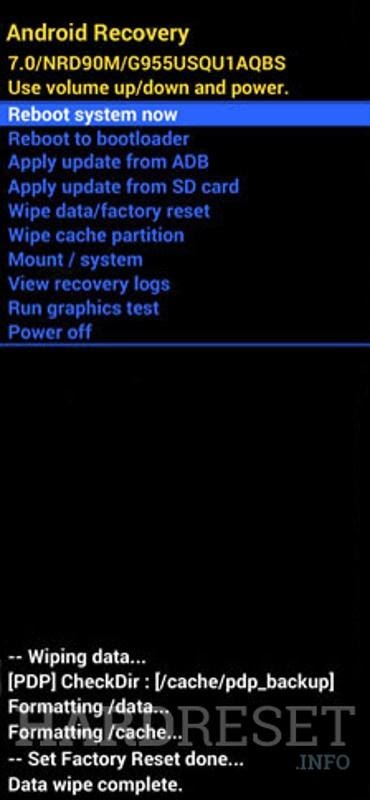
- Android Recovery Main Screen will appear. You need to scroll up and down using the volume buttons and confirm using the power button.

- Select the “Wipe data/factory reset” option and confirm using the power button.

- The hard reset process will start, and it may take some time to finish.
- Once the process is completed, the Recovery Main Screen will appear again.
- Scroll and choose the “Reboot system now” option.
- Your phone will reboot and will be restored to the factory settings.

Difference Between Hard and Soft Reset
A soft reset is a regular function that can be used to repair minor issues like application freezing, display freezing, a phone running slow, etc. You can do a soft reset without losing any data on your smartphone. A hard reset is used to address some major technical issues. Sometimes with an upgrade or due to the installation of an app, your phone may not work optimally. In some cases, resetting your phone back to the factory settings is the only way to get rid of the problem. You should not do a factory reset too often for every small issue that comes up.
Why You May Need to Do a Factory Reset
There are some cases when doing a factory reset becomes important. If you have done a software update on your phone and it is malfunctioning due to the update, then you need to do a factory reset. Doing so rolls back the phone to the factory settings it was shipped with. Some apps may cause the phone to malfunction and doing a factory reset may be the only option. If you want to sell your phone, then it is highly recommended to do a factory reset. This will clear all your personal data, passwords, etc. which is important before selling it to others.
Also, Read:
Will Your Phone Unroot After a Factory Reset?
A common question among customers with a rooted phone is whether their phone will become unrooted after doing a factory reset. A factory reset does not affect the rooting status of your smartphone. Your phone will remain rooted after doing a factory reset. All your custom kernel, ROM, application, settings, etc. will remain intact. Hence, you need not worry about doing a factory reset of a rooted phone.
How to Reboot/Restart Samsung Galaxy S20 Plus Ultra
There may be times that your smartphone becomes unresponsive. Even after waiting for it to respond after some time, it does not do so. You should do a reboot or soft reset of the phone to resolve these minor problems. The process for rebooting/restarting your Samsung Galaxy S20 Plus Ultra is as follows:
- Press the power button for a few seconds.
- You will see three options on the screen- power off, restart, and enable emergency mode.
- Tap on the “restart” tab on the screen.
- Your Samsung Galaxy S20 Plus Ultra smartphone will now restart.
If your smartphone has hanged and is not responding to the power button press, then you should follow the below-mentioned steps for restarting it:
- Press the power button and volume down button at the same time for seven seconds.
- Your smartphone will now restart, and the process of soft reset is complete.
How to Send GIF on Samsung Galaxy S20 Plus Ultra
You can easily make creative GIFs with your Samsung Galaxy S20 Plus Ultra. Sending a GIF makes a conversation more casual and relaxed. This flagship Samsung smartphone provides you the unique feature of creating GIFs without downloading any third-party apps. You can just use the phone’s camera to create some high-quality and stunning GIFs. You can take your creativity and GIF game to the next level by using the Samsung Galaxy S20 Plus Ultra smartphone. The process of sending GIFs using this smartphone is as follows:
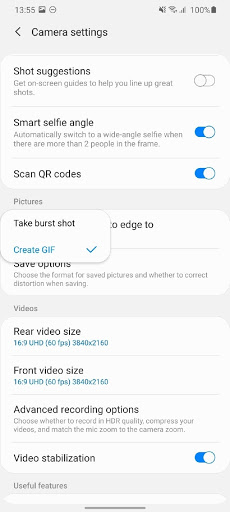
- Open the camera app settings.
- Scroll to the “Swipe shutter button edge to” option.
- Tap and hold on the “swipe shutter button edge to” button. You will get a menu from where you need to select “Create GIF”.
- This will enable the feature of creating GIFs by holding the shutter button each time.
- You can use the edit button in the gallery to delete frames or create more interesting looks in your GIFs.
Generally, the “swipe shutter button edge to” option is for taking burst shots. Tapping it and long holding it allows you to change the function to create GIFs.


 with Data Analytics")


