
Introduction
Huawei P21 Pro is a powerful phone. It provides some of the best features in its segment. The current article is meant to be a definitive guide on How to Root Huawei P21 Pro smartphone.
How to Root Huawei P21 Pro
Rooting an Android smartphone provides you administrator rights. You get complete access to the system directory and can control the way the operating system of the smartphone works. Rooting your phone allows you to add new features and functionalities to the software that was originally not available. You can flash a custom kernel by rooting and change the way it is tuned. It allows you to overclock the processor cores for more power or underclock them for improved battery life. Rooting an android phone opens many new features and possibilities. The different steps involved in rooting your Huawei P21 Pro smartphone are detailed below:
Step 1
Install ADB and FastBoot drivers on your computer.
Step 2
Enable USB debugging and OEM unlock options on the phone
- Go to the phone’s Settings.
- Select “About Phone” and tap 7 times on “Build Number”. Doing this will enable the developer options on the phone.
- Go back to the “Settings” tab. You will now find the “Developer Options” activated.
- Tap on “Developer Options” and go to the “OEM unlock” tab. Enable the toggle key.
- Go to “Developer Options” and search for “USB Debugging”. Slide the toggle key to enable it.
Step 3
Unlock Bootloader
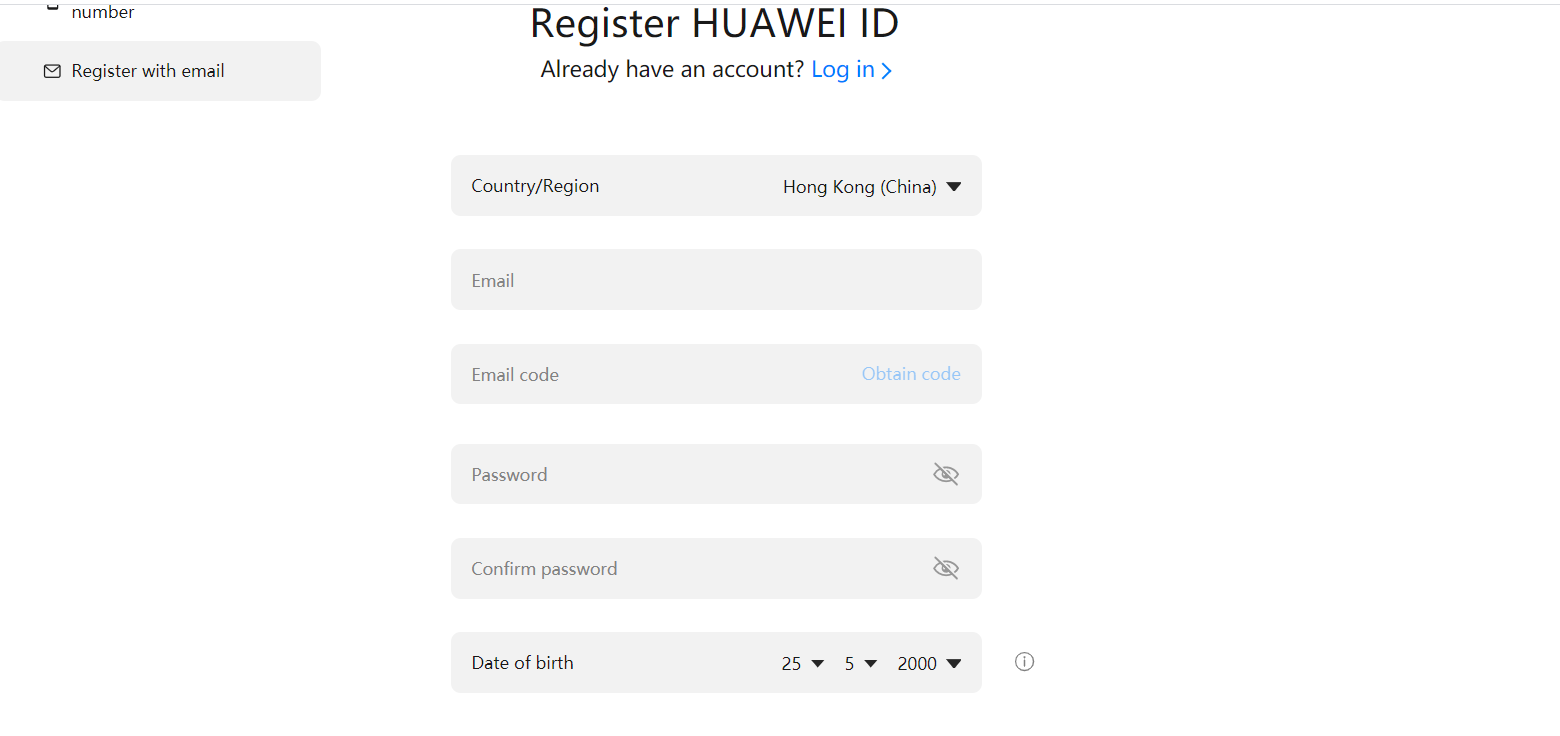
- Create a Huawei account by visiting their registration page
- Once you fill all the information and submit, you will get a 16-digit bootloader to unlock the password for your phone. Keep this password safe for further use.
- Power off your Huawei P21 Pro smartphone.
- Press the power and volume down button simultaneously. Release the power button when the phone vibrates.
- Your phone will now open in recovery mode. Connect it to a computer using a USB cable.
- Boot in the fastboot mode. In the Minimal ADB and Fastboot terminal, type the following command:
ADB reboot bootloader
- The smartphone will reboot in fastboot/bootloader mode. Run the following command to unlock the bootloader
Fastboot OEM unlock your-unlock-password
Provide your 16 digits unlock password in place of “your-unlock-password”. This will unlock your Huawei P21 Pro smartphone.
Step 4
Download the TWRP Recovery IMG file for your smartphone.
Step 5
Install TWRP Recovery IMG file
- Open the command prompt
- Run the following command in the command terminal to reboot into fastloader/bootloader mode
adb reboot bootloader
- Your device will open in bootloader mode now. Run the following command to install the TWRP Recovery IMG file
Fastboot flash ramdisk <name of the IMG file>
- Enter the following command to reboot your phone
Fastboot reboot
Step 6
Root by Using Magisk
-
- Download the latest Magisk or SuperSU Zip file.
- Once the download is complete, copy all the downloaded files to the SD card on your phone.
- Power off your phone.
- Press the power and volume button of your simultaneously. This will take you to the recovery or safe mode.
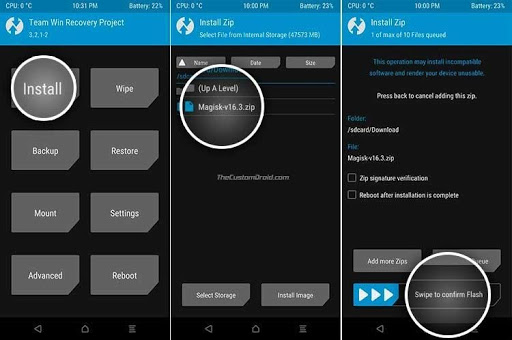
- Swipe on the “Unmodified system partition” warning.
- Click on the install tab.
- Go to storage and select the Magisk/SuperSU Zip file.
- Swipe on the “swipe to confirm flash” button to root your smartphone.
- Once done, tap on “reboot system”.
How to Screenshot Huawei P21 Pro
You may need to share some vital information instantly on your phone. Taking a screenshot of something you want to share is the best way to instantly share the details. There are different ways of taking screenshots on various phones. You can take screenshots on your Huawei P21 Pro using four different ways. You can choose the one that seems the most convenient to you. The different ways of taking screenshots on a Huawei P21 Pro are detailed below:
Taking Screenshots Using Hardware Buttons
The simplest way to take a screenshot on any Android smartphone is to use the hardware keys. You can take screenshots on your Huawei P21 Pro through hardware button in the following steps:
Step 1: Prepare the screen or details for which you want to take a screenshot.
Step 2: Press the power button and the volume down button on the phone at the same time.
Step 3: You will see that the screenshot has been captured. You can edit the screenshots to suit your requirements before sharing it with others.
Taking Screenshot Using Smart Assistance
Huawei P21 Pro comes with other ways to take screenshots. You can use the Smart Assistance feature to conveniently capture screenshots. The following steps should be followed for the same:
Step 1: Go to the “Settings” tab on your smartphone. You can do this either by opening the settings app or by swiping down on the notification panel and clicking on the settings button.
Step 2: Select the Smart Assistance tab
Step 3: Tap on Motion Control.
Step 4: You will now need to enable the smart screenshot under the “Knuckle Gestures”.
The smart Screenshot feature is very handy. Once you enable it, you can take screenshots on the Huawei P21 Pro in a seamless manner. You have to use your knuckles or scroll for taking screenshots.
Taking Screenshot Using the Notification Panel
Taking a screenshot using the notification panel is very simple on the Huawei P21 Pro smartphone. Just pull down the notification panel and tap on the screenshot option.
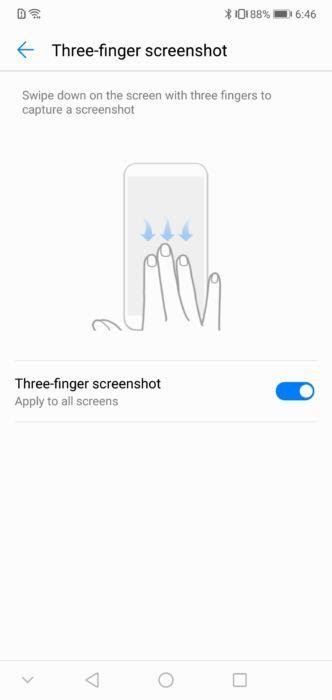
Taking Screenshot Using the Three-Finger Gesture
You can take a screenshot by using your three fingers. This option needs to be enabled before you can start using it.
Step 1: Open the settings app or pull down the notification panel and tap on the settings icon.
Step 2: Click on Smart Assistance.
Step 3: Tap on Motion Control.
Step 4: Select the Three-Finger screenshot and enable it.
Now that the three-finger option is enabled, you can scroll up or down using three fingers on the phone’s screen.
How to Factory Reset Huawei P21 Pro?
Doing a factory reset (also known as a hard reset) restores your phone to the factory settings it was made in. You install several apps on your phones that may change the way it works.
Your smartphone may become overloaded with apps and stop functioning optimally. Even downloading a new software update may turn out to be malicious and tamper the functioning of your smartphone.
In such cases, you may consider doing a factory reset. Factory reset takes your smartphone back to the settings it was shipped in. You should also do a factory reset before reselling your smartphone.
There are several ways of doing a factory reset on your smartphone. Some of the ways to factory reset your Huawei P21 Pro smartphone are discussed below:
Option 1: Hard Reset Using Software Menu
Step 1: Ensure that the phone’s battery is charged adequately. Backup all important data on your smartphone before doing a factory reset.
Step 2: Go to the “Settings” menu and search for Backup and Reset option
Step 3: Click on the Factory Data Reset and tap on Backup and Reset option.
Step 4: Click on the Reset Phone

Step 5: Check the “erase internal storage” checkbox and click on the “reset phone” tab.
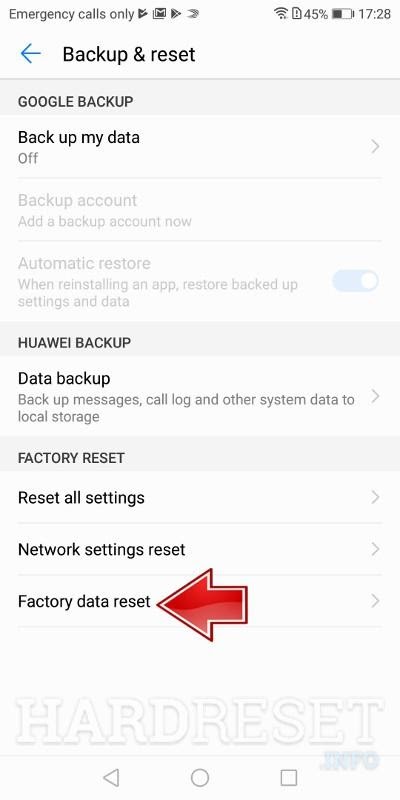
Image Source: hardreset.info
Step 6: Confirm that you are ready to do a factory reset.
This will do a factory reset of your Huawei P21 Pro.
Option 2: Factory Reset Using Hardware Key Button
Step 1: Make sure that the battery of your smartphone.
Step 2: Power off your Huawei P21 Pro smartphone.
Step 3: Press the power button and volume up button for a few seconds.
Step 4: You will get a menu on the display. Continue following this menu for doing a factory reset.
Step 5: Use the volume up or volume down button for moving through the options and power button to OK or enter to confirm.
Option 3: Factory Reset Using MicroSD Card Firmware Update
You can also do a factory reset using the MicroSD card firmware update. This process is more technical than the simple factory reset using hardware and software settings. You should follow this process only if you have sound technical knowledge about doing so.
Also, Check: How to Root LG K6
Step 1: Make sure that the phone’s battery is completely charged.
Step 2: Power off your smartphone
Step 3: Remove the microSD card from your phone and connect it to your computer.
Step 4: Download firmware using your computer browser. You can visit http://www.huaweidevice.com or http://consumer.huawei.com/ for downloading the same.
Step 5: Extract the downloaded folder. Copy all the contents of this folder to the root location of the MicroSD card.
Step 6: Take out the MicroSD card and put it back in the phone.
Step 7: Switch on your Huawei P21 Pro smartphone by pressing the power +volume up +volume down button till you see the Android logo.
Step 8: The process of firmware installation will begin. You need to wait for nearly 10 minutes for the process to complete.
Step 9: The firmware can also be updated using the Updated application.
How to Restart / Reboot Huawei P21 Pro
Restarting or rebooting a smartphone is also known as a soft reset. A soft reset can help resolve minor phone issues. It closes all the operations and clears data from the random access memory (RAM) of your smartphone. You can get rid of issues like a clogged application, frozen device, slow working phone, etc. by doing a soft reset.
A soft reset is completely safe as you do not stand the risk of losing any data on your smartphone. Due to this, there is no need to take a data backup before doing a soft reset. The following steps help you do a soft reset of your Huawei P21 Pro smartphone:
Step 1: Press the power key while your smartphone is on. Continue to keep pressing it for a few seconds.
Step 2: From the menu option, select Power Off and tap on OK.
Step 3: Once the phone is switched off, wait for at least 5 seconds before turning it on.
Step 4: Press the power button again to switch on the smartphone. This completes the process of restarting/rebooting your Huawei P21 Pro smartphone.
How to Send GIFs in Huawei P21 Pro?
You can send GIFs from your Huawei P21 Pro smartphone by using a compatible app. An animated GIF is a fun and easy way of communicating with your audience. GIFs do not take up much space on your smartphone and thus helps you save on storage. You cannot send GIFs from your Android smartphone directly. A compatible app is needed.
Many apps help you send GIFs from your Android smartphone. One such popular app is GIF Droid. You can download it from the Play Store and start sending animated GIFs. The steps for sending GIFs using this app are discussed below:
Step 1: Install the GIF Droid application from Play Store.
Step 2: Once installed, open the app. You will need a video to convert it into a GIF.
Step 3: Choose from “Select Video” or “Record Video” options in the app. The select video option allows you to choose an existing video on your smartphone. The record video option lets you record a new video for making a GIF.
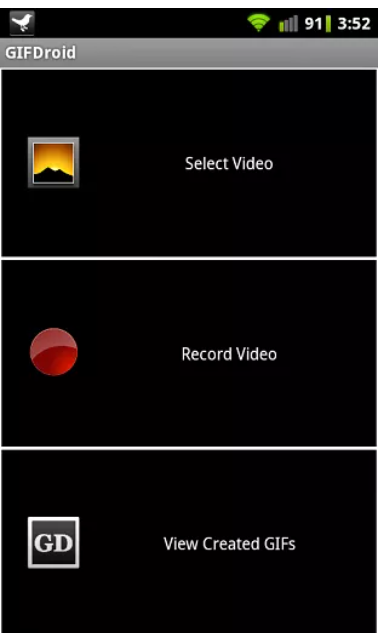
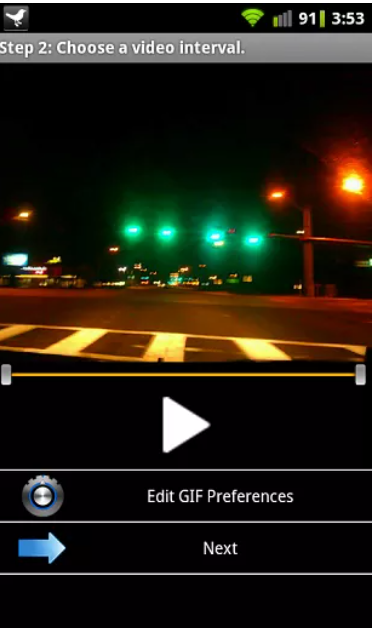
Image source- cnet.com
Step 4:Select the section of the video you want to make into an animated GIF. You can use the slider to choose the starting and ending duration of the video.
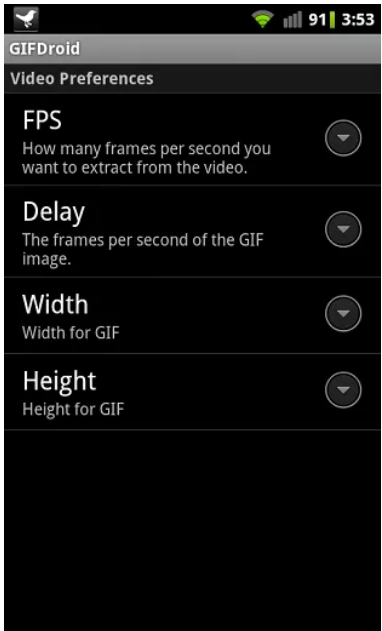
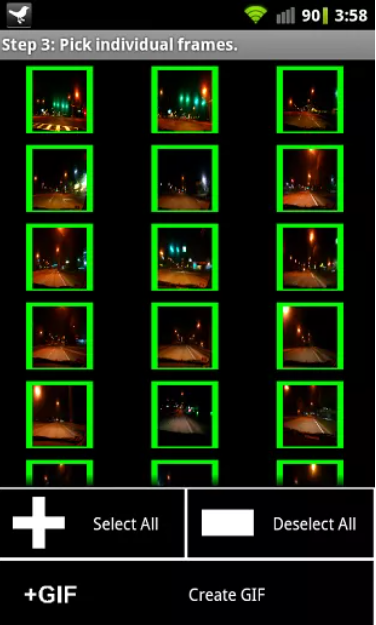
Step 5: Go to the “Video Preferences” section and choose the different details like frames per second (FPS), delay, height, and width for your GIF. This helps you to eliminate sections in the video that are of little importance. You can reduce the size of your animated GIFs using this.
Step 6: Click on the “Create GIF” tab on the bottom right corner of your phone. Doing so completes your project.
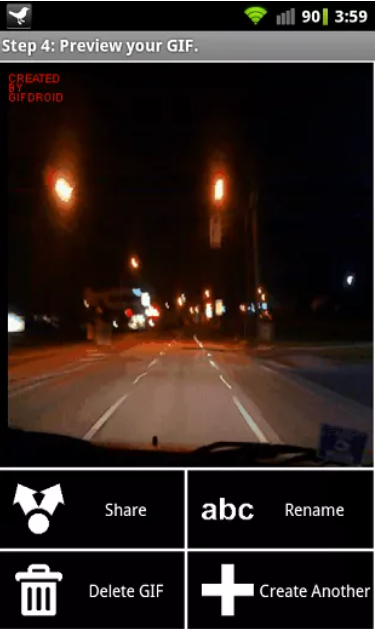
Step 7: The last step is to preview the GIF before sharing it. You can also rename the GIF, make a new GIF, or delete the one you made.
You can create some wonderful and creative animated GIFs using this app. Sharing them will win you appreciation from others.

